What is Email Outreach?
Email outreach is the process of creating and sending marketing messages to improve brand awareness. In the case of influencer marketing, it is often used to propose a collaboration between your brand and a content creator or to maintain existing relationships.
How Do I Create an Outreach Email?
Outreach emails are available for all subscriptions that include IRM & Data. To create one go to Communication and Outreach campaigns.
Click Create outreach.

If this is your first time using Influencity’s bulk email feature, you’ll be asked to configure your bulk email first. There are two options:
- Create an Influencity email (choose a username and add it to an Influencity address, for example yourname@78E_2QX.influ.email).
- Customize an email from your own email address (yourname@yourbrand.email – this involves doing a basic domain redirect in your email).
Learn how to do this step-by-step here.
Warning: As of February 2024, bulk email senders who send to Gmail, Yahoo, or Google Workspace recipients will have to complete extra requirements in order to ensure the delivery of their campaigns. Read about the new requirements for bulk senders here.
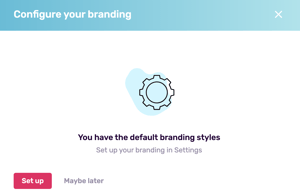
If you have not yet configured your branding, you will also be asked to do so before you proceed. This is an easy way to personalize your outreach messages.
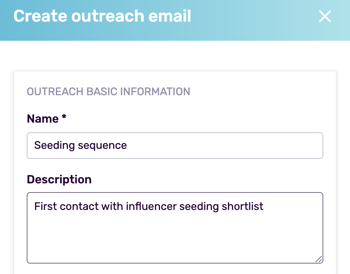
Name your outreach and add an optional description to help your team members understand its purpose.
Step 1: Draft Your Outreach Email with Personalization Tokens
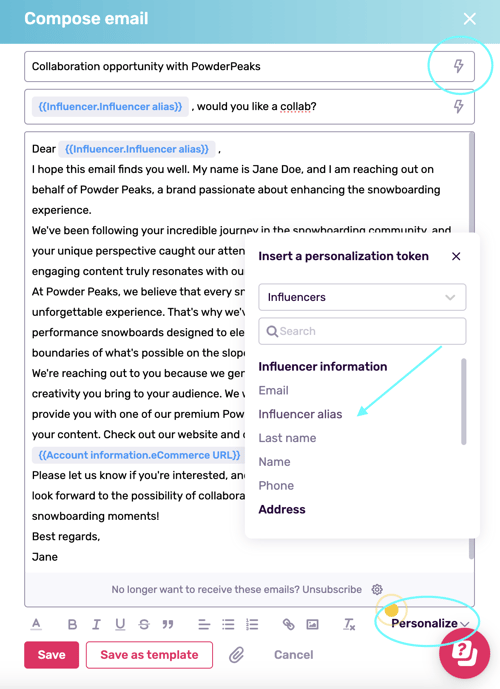
Open your new outreach email. At first it will be completely blank. Open the Email tab and click Compose email.
Choose to write your text from scratch or based on an existing template.

Draft your marketing email. Your outreach is composed of 3 parts
- Subject
- Preview text (a short description that’s shown as a preview in the inbox)
- Email body
All 3 must be filled in in order to be able to hit Save. If you want to reuse this text in future emails, you can also save this email as a template. To keep your emails personal while working at scale, use the personalization tokens that appear when you click the lightning icon or the Personalize button.
For example, in our outreach we’ve written “Dear Influencer alias,”. When the influencers in our outreach campaign open this email, it will be personalized to each and every one of them depending on the information we’ve filled in in the Influencer Alias section of their profile.
For an overview of the personalization tokens and when to use them, click here.
Tip: It’s a good idea to review an influencer’s information before using the personalization tokens to make sure that you will auto-populate the correct data. To see how to do this without leaving the outreach page, click here.
Step 2: Add Influencers
The next step is to add influencers in the Recipients tab. You can add influencers one by one or select a list from your IRM.

You will only be able to add influencers who have a valid email address saved in your IRM. If you’re unable to add an influencer for this reason, you’ll have to save this information and try again afterwards.

Tip: If you associate a social media profile to an influencer, any public email address associated with their profile will be added to their influencer page in your IRM. Learn more here.
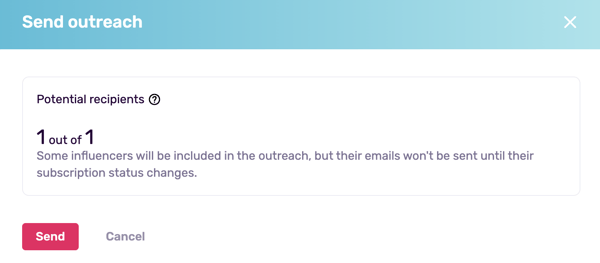
You’ll get a pop-up window confirming the number of potential recipients. Again, if some of the selected influencers do not have an email, you will need to add one before they can be included and receive your communication.
Click Add influencers.
Now, the Recipients tab will list all the influencers you’ve just added. Before going any further, it may be a good idea to review the name and alias of each influencer in your outreach, to ensure that your personalization tokens are filled in correctly. To do this, hover over the influencer’s row and select Edit influencer. You can then view and edit their information in a side window.
Tip: You can customize the recipients table to see the data you need. Just click Actions, select Edit Columns, and select the columns you want to appear.
Step 3: Active Your Outreach
It may be a good idea to send a test email before activating the entire outreach. Click Send test email, select the email where you want to receive the test, and choose the influencer to auto-populate the personalization tokens.
If you’re satisfied with your test email, you’re ready to go. Click Activate outreach.
Warning: Once an outreach has been activated, you will not be able to edit the email text or eliminate influencer recipients.
Your active outreach will now record email performance in real time. To add influencers, go to Add influencers, on the right.

Influencers added to an active outreach will be sent their outreach email automatically when you press Send.
Step 4: Monitor Performance
Email insights will be updated in real time in the performance tab. For a full description of all the metrics and what they mean, click here.
Next Steps
Finalize any email outreach campaigns that are no longer in use. Finalizing an outreach campaign means that you will no longer be able to add influencers, but you can still see updated performance data.
To create variations of the same outreach, hover over its name and click Duplicate. This will duplicate the subject, preview, and email text; the influencers will have to be added separately.
FAQs
How Many Outreach Emails Can I Send?
Your outreach limit is 5x your influencer storage limit. For example, if our max influencer storage is 600 influencers, our max number of outreach emails is 3,000 per month. You can consult this by going to Profile & preferences and scrolling down to Products & billing.
Outreach emails are “charged” per influencer included in your outreach. If you send an outreach email to 50 influencers, 50 emails are deducted from your account.

Can I Edit an Existing Outreach Email?
You can only edit emails that are in draft. Once an email has been activated, it cannot be edited.
What Are the Influencer Statuses?
All the influencers in your outreach are listed in a table in the Recipients tab. In the “Status” column, you’ll see one of 3 options:
- Not processed - this means your outreach is still in draft and has not been sent.
- Processing - this may appear if you’ve included many recipients and there’s a slight delay in sending.
- Processed - you outreach has been sent and the email has been delivered, bounced, or the recipient has unsubscribed.